5.안드로이드 리싸이클러뷰 + [소스코드]
0.build.gradle에 의존성 추가
// 리사이클러뷰
implementation "androidx.recyclerview:recyclerview:1.1.0"
// For control over item selection of both touch and mouse driven selection
implementation "androidx.recyclerview:recyclerview-selection:1.1.0-rc01"
// 카드뷰
implementation "androidx.cardview:cardview:1.0.0"
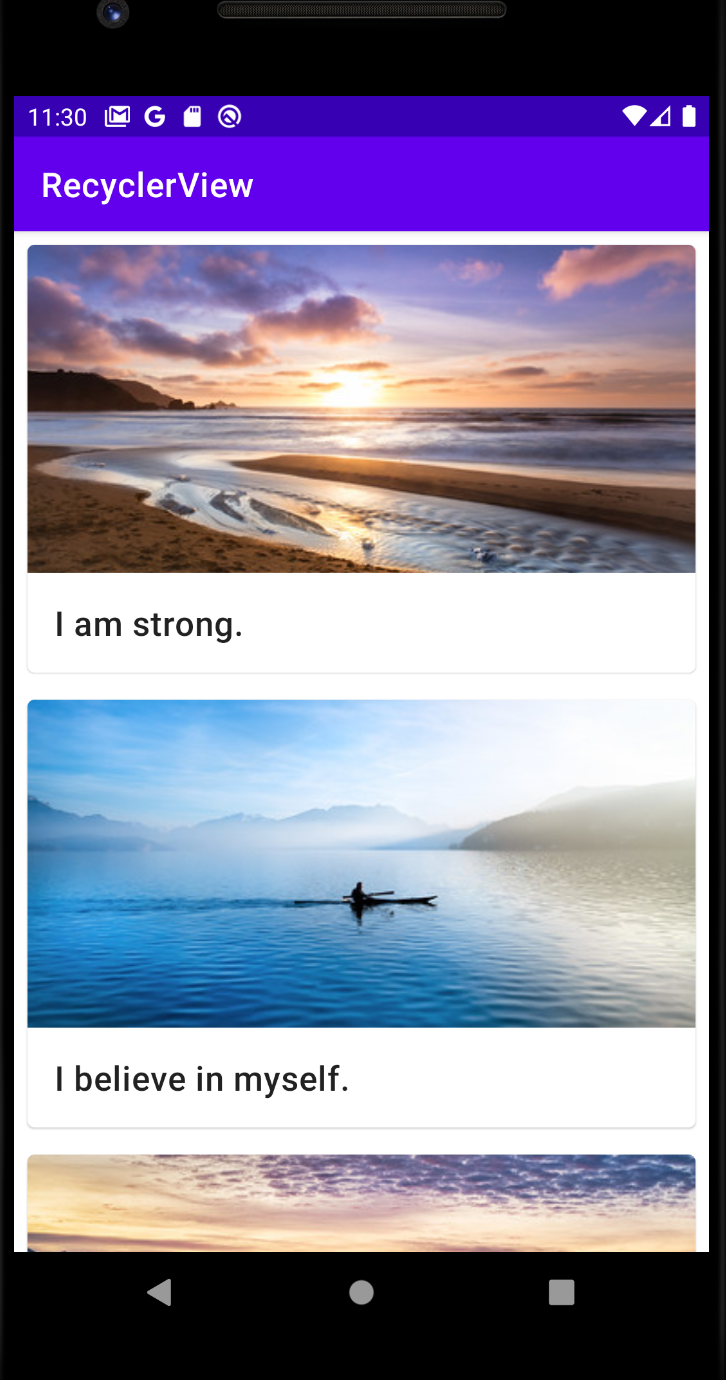
1.데이터 만들기 - drawable에 이미지 데이터를 넣어준다. values 폴더 string.xml 파일에 아래와 같이 작성해준다.
<resources>
    <string name="app_name">RecyclerView</string>
    <string name="affirmation1">I am strong.</string>
    <string name="affirmation2">I believe in myself.</string>
    <string name="affirmation3">Each day is a new opportunity to grow and be a better version of myself.</string>
    <string name="affirmation4">Every challenge in my life is an opportunity to learn from.</string>
    <string name="affirmation5">I have so much to be grateful for.</string>
    <string name="affirmation6">Good things are always coming into my life.</string>
    <string name="affirmation7">New opportunities await me at every turn.</string>
    <string name="affirmation8">I have the courage to follow my heart.</string>
    <string name="affirmation9">Things will unfold at precisely the right time.</string>
    <string name="affirmation10">I will be present in all the moments that this day brings.</string>
</resources>
2.데이터를 담을 Model 클래스를 생성한다.
package com.example.recycler

import android.util.Log
import androidx.annotation.DrawableRes
import androidx.annotation.StringRes

data class MyModel (@StringRes val stringResourceId: Int, @DrawableRes val imageResourceId:Int) {

    val TAG:String = "로그"
    //기본 생성자
    init {
        Log.d(TAG , "MyModel - init() called")
    }
}
3.데이터 소스 만들기 - Datasource 코틀린 파일을 생성하고 위에서 만든 모델에 데이터를 넣어놓는다.
package com.example.recycler

class Datasource(){
    fun loadMyData():List<MyModel>{
        return listOf<MyModel>(
            MyModel(R.string.affirmation1 , R.drawable.image1) ,
            MyModel(R.string.affirmation2 , R.drawable.image2),
            MyModel(R.string.affirmation3 , R.drawable.image3),
            MyModel(R.string.affirmation4 , R.drawable.image4),
            MyModel(R.string.affirmation5 , R.drawable.image5),
            MyModel(R.string.affirmation6 , R.drawable.image6),
            MyModel(R.string.affirmation7 , R.drawable.image7),
            MyModel(R.string.affirmation8 , R.drawable.image8),
            MyModel(R.string.affirmation9 , R.drawable.image9),
            MyModel(R.string.affirmation10 , R.drawable.image10)
        )
    }
}
4.ItemAdapter 코틀린 파일을 생성한다.
package com.example.recycler


import android.content.Context
import android.util.Log
import android.view.LayoutInflater
import android.view.View
import android.view.ViewGroup
import android.widget.AdapterView
import android.widget.ImageView
import android.widget.TextView
import androidx.recyclerview.widget.RecyclerView

//이 class에서는 context, dataset을 인자로 받은 후 RecyclerView.Adapter<ItemAdapter.ItemViewHolder>()를 반환하는 adapter를 만들것이다.
class ItemAdapter(private val context : Context , private val dataset : List<MyModel>): RecyclerView.Adapter<ItemAdapter.ItemViewHolder>() {

    // (1) 아이템 레이아웃과 결합
    //onCreateViewHolder: RecyclerView의 새로운 viewHolder를 생성해준다.
    // (재사용 가능한 viewHolder 없는 경우 호출 됨) 이를 위해서 recycler_item.xml을 inflate하고 ItemViewHolder를 반환한다.
    override fun onCreateViewHolder(parent: ViewGroup, viewType: Int): ItemViewHolder {
        val adapterLayout = LayoutInflater.from(parent.context).inflate(R.layout.recycler_item , parent , false)
        return ItemViewHolder(adapterLayout)
    }

    // (2) 리스트 내 아이템 개수
    //dataset의 크기를 반환한다.
    override fun getItemCount()=dataset.size


    //(3) View에 내용 입력
    //onBindViewHolder: item view의 contents를 바꿔주는 메서드이다.
    // 이를 위해서 dataset[position]으로 item view에 들어갈 item을 반환받는다. 이후 textview, imageview에 item의 contents를 set해준다.
    override fun onBindViewHolder(holder: ItemViewHolder, position: Int) {
        val item = dataset[position]
        holder.textView.text = context.resources.getString(item.stringResourceId)
        holder.imageView.setImageResource(item.imageResourceId)

        // (3-1) 리스트 내 항목 클릭 시 onClick() 호출
        holder.itemView.setOnClickListener {
            itemClickListener.onClick(it, position)
        }
    }
    // (3-2) 리스너 인터페이스
    interface OnItemClickListener{
        fun onClick(v:View , position: Int)
    }
    // (3-3) 외부에서 클릭 시 이벤트 설정
    fun setItemClickListener(onItemClickListener: OnItemClickListener){
        this.itemClickListener = onItemClickListener
    }
    // (3-4) setItemClickListener로 설정한 함수 실행
    private lateinit var itemClickListener:OnItemClickListener


    // (4) 레이아웃 내 View 연결
    class ItemViewHolder(private val view:View) : RecyclerView.ViewHolder(view) {
        val textView: TextView = view.findViewById(R.id.item_title)
        val imageView: ImageView = view.findViewById(R.id.item_image)
    }


}
5.MainActivity 작성
package com.example.recycler

import android.content.Intent
import androidx.appcompat.app.AppCompatActivity
import android.os.Bundle
import android.util.Log
import android.view.View
import android.widget.Toast
import androidx.recyclerview.widget.RecyclerView

class MainActivity : AppCompatActivity() {
    override fun onCreate(savedInstanceState: Bundle?) {
        super.onCreate(savedInstanceState)
        setContentView(R.layout.activity_main)

        //1. 데이터 불러오기
        //-> Datasource().loadMyData() 함수로 string.xml과 drawable에 있는 text, image를 리스트로 반환받는다.
        val myData = Datasource().loadMyData()

        Log.d("로그" , "myData.size: ${myData.size}")

        //2.RecyclerView findViewById로 찾기
        val recyclerView = findViewById<RecyclerView>(R.id.recycler_view)

        //3. RecyclerView에 adapter 연결하기
        //-> 우리가 정의한 ItemAdapter를 생성해서 RecyclerView.adpater로 연동하되, adapter의 인자로는 context와 data를 넣어주어야 한다.
        val adapter = ItemAdapter(this , myData)
        recyclerView.adapter = adapter

        //리사이클러뷰 클릭 이벤트
        adapter.setItemClickListener(object: ItemAdapter.OnItemClickListener{
            override fun onClick(v: View, position: Int) {
                // 클릭 시 이벤트 작성
                val intent = Intent(applicationContext,DetailView::class.java)
                intent.putExtra("param",myData[position].imageResourceId)
                startActivity(intent)
            }
        })

        recyclerView.setHasFixedSize(true)


    }
}
6.layout 폴더에 recycler_item.xml 파일 생성
<?xml version="1.0" encoding="utf-8"?>
<com.google.android.material.card.MaterialCardView xmlns:android="http://schemas.android.com/apk/res/android"
    android:layout_width="match_parent"
    android:layout_height="wrap_content"
    android:layout_margin="8dp">

    <LinearLayout
        android:layout_width="match_parent"
        android:layout_height="wrap_content"
        android:orientation="vertical">

        <ImageView
            android:id="@+id/item_image"
            android:layout_width="match_parent"
            android:layout_height="194dp"
            android:importantForAccessibility="no"
            android:scaleType="centerCrop" />

        <TextView
            android:id="@+id/item_title"
            android:layout_width="wrap_content"
            android:layout_height="wrap_content"
            android:padding="16dp"
            android:textAppearance="?attr/textAppearanceHeadline6" />

    </LinearLayout>

</com.google.android.material.card.MaterialCardView>
7.activity_main.xml 에 리사이클러뷰 작성
<?xml version="1.0" encoding="utf-8"?>
<FrameLayout xmlns:android="http://schemas.android.com/apk/res/android"
    xmlns:app="http://schemas.android.com/apk/res-auto"
    xmlns:tools="http://schemas.android.com/tools"
    android:layout_width="match_parent"
    android:layout_height="match_parent"
    tools:context=".MainActivity">

    <androidx.recyclerview.widget.RecyclerView
        android:id="@+id/recycler_view"
        android:layout_width="match_parent"
        android:layout_height="match_parent"
        app:layoutManager="androidx.recyclerview.widget.LinearLayoutManager"
        android:scrollbars="vertical"/>
</FrameLayout>
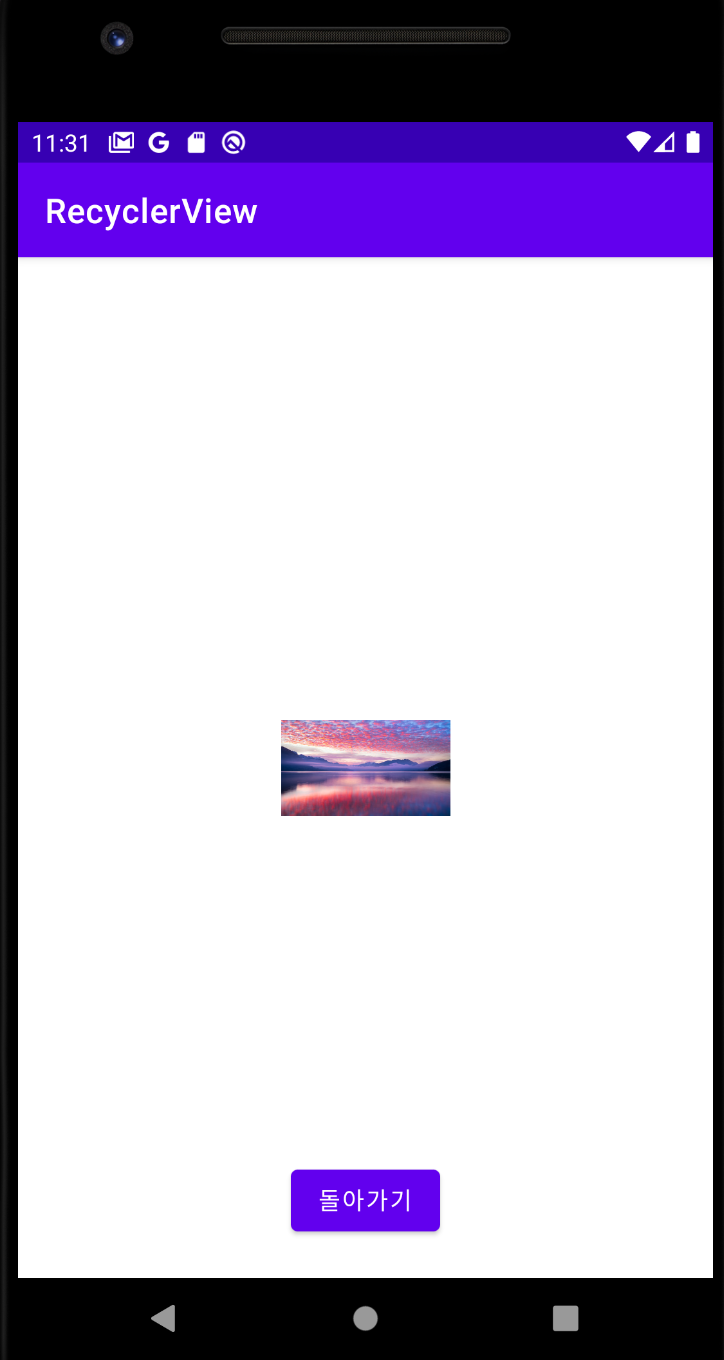
참고 : 리사이클러뷰 cell 클릭시 상세보기 페이지
package com.example.recycler

import androidx.appcompat.app.AppCompatActivity
import android.os.Bundle
import android.widget.Button
import android.widget.ImageView
import android.widget.Toast

class DetailView : AppCompatActivity() {
    override fun onCreate(savedInstanceState: Bundle?) {
        super.onCreate(savedInstanceState)
        setContentView(R.layout.activity_detail_view)
        //메인화면에서 전달한 파라미터 받기
        val param = intent.getIntExtra("param" , 0)
        val img = findViewById<ImageView>(R.id.imageView1)

        Toast.makeText(applicationContext,
            "${param}",
            Toast.LENGTH_SHORT).show()

        img.setImageResource(param)

        val btn = findViewById<Button>(R.id.button1)
        btn.setOnClickListener {
            finish()
        }

    }
}
<?xml version="1.0" encoding="utf-8"?>
<androidx.constraintlayout.widget.ConstraintLayout xmlns:android="http://schemas.android.com/apk/res/android"
    xmlns:app="http://schemas.android.com/apk/res-auto"
    xmlns:tools="http://schemas.android.com/tools"
    android:layout_width="match_parent"
    android:layout_height="match_parent"
    tools:context=".DetailView">

    <ImageView
        android:id="@+id/imageView1"
        android:layout_width="100dp"
        android:layout_height="100dp"
        app:layout_constraintBottom_toBottomOf="parent"
        app:layout_constraintEnd_toEndOf="parent"
        app:layout_constraintStart_toStartOf="parent"
        app:layout_constraintTop_toTopOf="parent"
        tools:srcCompat="@tools:sample/avatars" />

    <Button
        android:id="@+id/button1"
        android:layout_width="wrap_content"
        android:layout_height="wrap_content"
        android:layout_marginTop="160dp"
        android:text="돌아가기"
        app:layout_constraintBottom_toBottomOf="parent"
        app:layout_constraintEnd_toEndOf="parent"
        app:layout_constraintStart_toStartOf="parent"
        app:layout_constraintTop_toBottomOf="@+id/imageView1" />
</androidx.constraintlayout.widget.ConstraintLayout>
'안드로이드' 카테고리의 다른 글
| 4.안드로이드 Fragment - navigationBar 작업 + [소스코드] (0) | 2022.02.03 |
|---|---|
| 3.안드로이드 Intent 데이터와 화면전환 (0) | 2022.02.02 |
| 2.안드로이드 getSharedPreferences (0) | 2022.02.02 |
| 1.안드로이드 retrofit 사용 따라하기 (0) | 2022.02.01 |

