swift 디자인 패턴 - 커맨드 패턴
목표 : 기능을 캡슐화로 처리하는 방법 이해하기
커맨드 패턴을 통한 기능의 캡슐화 방법이해하기
만능 버튼 만들기
기능 : 눌리면 특정 기능을 수행
[코드]
//MARK: 1.일반
class Lamp {

    func turnOn(){
        print("lamp on")
    }
}

class Button{
    private var theLamp:Lamp?

    init(theLamp: Lamp? = nil) {
        self.theLamp = theLamp
    }

    func pressed(){
        theLamp?.turnOn()
    }
}

let lamp = Lamp()
let lampButton = Button(theLamp: lamp)
lampButton.pressed()

//lamp on

print("")
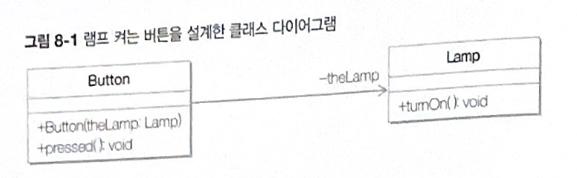
Button 클래스의 생성자를 이용해 불을 켤 Lamp 객체를 전달한다.
그리고 Button 클래스의 pressed 메서드가 호출되면 생성자를 통해 전달받은 Lamp 객체의 turnOn 메서드를 호출해서 불을 켠다.
문제점
[1] 누군가 버튼을 눌렀을 때 램프가 켜지는 대신 다른 기능을 실행하게 하려면 어떤 변경 작업을 해야 하는가?
예를 들어 버튼을 눌렀을 때 알람이 시작되게 하려면?
[2] 버튼을 누르는 동작에 따라 기능을 실행하게 하려면 어떤 변경 작업을 해야 하는가?
예를 들어 버튼을 처음 눌렀을 때는 램프를 켜고, 두 번째 눌렀을 때는 알람을 동작하게 하려면?
버튼을 눌렀을 때 다른 기능을 실행하는 경우
- 램프를 켜는 대신 알람을 시작하게 하려면 Button 클래스의 pressed 메서드를 수정해야한다.
[버튼을 눌렀을때 다른 기능을 실행하게 하는 코드]
//MARK:  2.버튼을 눌렀을 때 다른 기능을 실행하는 경우
class Alarm{
    func start(){
        print("Alarming...")
    }
}

class ButtonB{
    var theAlarm : Alarm?
    init(theAlarm: Alarm? = nil) {
        self.theAlarm = theAlarm
    }
    func pressed(){
        theAlarm?.start()
    }
}

let alarm = Alarm()
let alarmButton = ButtonB(theAlarm: alarm)
alarmButton.pressed()

//Alarming...

print("")
이제 Button 클래스는 버튼을 눌렀을 때 알람이 동작하게 할 수 있다.
그러나 기능을 변경하려고 기존 Button 클래스의 코드를 수정하는 것은 OCP에 위배된다.
(pressed 메서드 전체를 바꿔야 하기 때문..)
버튼을 누르는 동작에 따라 다른 기능을 실행하게 하려면 기능이 실행되는 시점에 필요한 프로그램(혹은 메서드)을 선택할 수 있어야 한다.
예를 들어 버튼을 처음 눌렀을 때는 램프를 켜고 두 번 눌렀을 때는 알람을 동작하게 할 경우에 Button 클래스는 2가지 기능(램프 켜기와 알람 동작)
[버튼을 누르는 동작에 따라 다른 기능을 실행하는 경우의 코드]
//MARK: 3.버튼을 누르는 동작에 따라 다른 기능을 실행하는 경우의 코드

class LampC {

    func turnOn(){
        print("lamp on")
    }
}


class AlarmC{
    func start(){
        print("Alarming...")
    }
}

enum Mode : String{
    case LAMP
    case ALARM
}

class ButtonC{
    private var theLamp:LampC?
    private var theAlarm:AlarmC?
    private var theMode:Mode?


    init(theLamp: LampC? = nil, theAlarm: AlarmC? = nil, theMode: Mode? = nil) {
        self.theLamp = theLamp
        self.theAlarm = theAlarm
        self.theMode = theMode
    }

    //램프 또는 알람 모드를 설정
    func setMode(mode:Mode){
        self.theMode = mode
    }

    //설정된 모드에 따라 램프를 켜거나 알람을 울림
    func pressed(){
        switch theMode {

        case .LAMP:
            theLamp?.turnOn()

        case .ALARM:
            theAlarm?.start()

        default:
            theLamp?.turnOn()
        }
    }
}


let lampC = LampC()
let alarmC = AlarmC()
let buttonC = ButtonC(theLamp: lampC , theAlarm: alarmC)
buttonC.setMode(mode: .LAMP)
buttonC.pressed()
buttonC.setMode(mode: .ALARM)
buttonC.pressed()

/*
 lamp on
 Alarming...
 */


print("")
위 코드도 버튼을 눌렀을 때의 기능을 변경하기 위해서 다시 Button 클래스의 코드를 수정했다.
이러한 수정은 버튼을 눌렀을 때 필요한 기능을 새로 추가할 때마다 반복적으로 발생할 것이다.
즉 , Button 클래스에 새로 기능을 추가할 때마다 코드를 수정해야한다면 Button 클래스는 재사용하기 어렵다.
해결책
새로운 기능을 추가하거나 변경하더라도 Button 클래스를 그대로 사용하려면 Button 클래스의 pressed 메서드에서 구체적인 기능(램프 켜기, 알람 동작 등)을 직접 구현하는 대신, 버튼을 눌렀을 때 실행될 기능을 Button 클래스 외부에서 제공받아 캡슐화해서 pressed 메서드에서 호출하는 방법을 사용할 수가 있다.

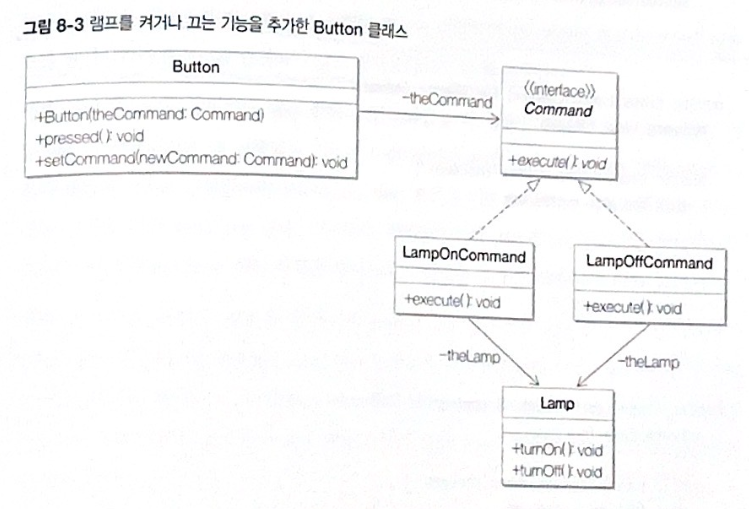
Button 클래스는 램프 켜기 또는 알람 동작 등의 기능을 실행할 때 Lamp 클래스의 turnOn 메서드나 Alarm 클래스의 start 메서드를 직접 호출하지 않는다.
대신 미리 약속된 Command 인터페이스의 execute 메서드를 호출한다. 그리고 LampOnCommand 클래스에서는 execute 메서드를 구현해 램프 켜는 기능을 구현한다.
즉, LampOnCommand 클래스는 execute 메서드에서 Lamp 클래스의 turnOn 메서드를 호출해 램프 켜는 기능을 구현한다.
AlarmStartCommand 클래스는 알람이 울리게 하려고 Command 인터페이스의 execute 메서드를 구현해서 Alarm 클래스의 start 메소드를 호출한다.
[코드]
//MARK: 해결 1
protocol Command{
    func execute()
}

class ButtonD{
    var theCommand:Command?

    init(theCommand: Command? = nil) {
        self.theCommand = theCommand
    }

    func setCommand(command:Command){
        self.theCommand = command
    }
    func pressed(){
        theCommand?.execute()
    }
}


//램프 클래스
class LampD {
    func turnOn(){
        print("lamp on")
    }
}


//램프를 키는 커멘드
class LampOnCommand:Command{

    private var theLamp:LampD?

    init(theLamp: LampD? = nil) {
        self.theLamp = theLamp
    }

    func execute() {
        theLamp?.turnOn()
    }
}


//알람 클래스
class AlarmD{
    func start(){
        print("Alarming...")
    }
}

//알람을 실행하는 커멘드
class AlarmOnCommand:Command{
    private var theAlarm:AlarmD?

    init(theAlarm: AlarmD? = nil) {
        self.theAlarm = theAlarm
    }

    func execute() {
        theAlarm?.start()
    }
}


let lampD = LampD()
let lampOnCommand = LampOnCommand(theLamp: lampD)
let button1 = ButtonD(theCommand: lampOnCommand)
button1.pressed()

print("")

let alarmD = AlarmD()
let alarmOnCommand = AlarmOnCommand(theAlarm: alarmD)
let button2 = ButtonD(theCommand: alarmOnCommand)
button2.pressed()

/*
 lamp on

 Alarming...
 */


print("")
Command 인터페이스를 구현하는 LampOnCommand와 AlarmCommand 객체를 Button 객체에 설정한다.
그리고 Button 클래스의 pressed 메서드에서 Command 인터페이스의 execute 메서드를 호출 해서 LampOnCommand와 AlarmCommand 클래스의 execute 메서드를 실행할 수가 있다.
즉, 버튼을 눌렀을 때 필요한 임의의 기능은 Command 인터페이스를 구현한 클래스의 객체를 Button 객체에 설정해서 실행할 수 있다.
따라서 Button 클래스는 소스 코드를 변경하지 않으면서도 다양한 동작을 구현할 수 있다.
2번째 예)
버튼을 처음 눌렀을 때 램프 켜기, 두번 눌렀을 때는 램프를 끄는 기능 구현.
(램프를 끄는 기능을 구현하는 LampOffCommand 클래스를 새롭게 정의한다.)
-램프를 끄는 기능을 구현하기 위해서 LampOffCommand 클래스가 Command 인터페이스를 구현하도록 한다.
-Lamp 클래스에는 기존의 켜는 기능을 위한 turnOn 메서드뿐만 아니라 끄기 위한 turnOff 메서드를 구현한다.
[코드]
protocol CommandInterface{
    func execute()
}


class GoodLamp{
    func turnOn(){
        print("turnON")
    }
    func turnOff(){
        print("turnOff")
    }
}

//램프를 키는 클래스
class LampTrunOnCommand:CommandInterface{

    var lamp:GoodLamp?
    init(lamp: GoodLamp? = nil) {
        self.lamp = lamp
    }

    func execute() {
        lamp?.turnOn()
    }
}


//램프를 끄는 클래스
class LampTrunOffCommand:CommandInterface{

    var lamp:GoodLamp?
    init(lamp: GoodLamp? = nil) {
        self.lamp = lamp
    }

    func execute() {
        lamp?.turnOff()
    }
}

class MyButton{

    var theCommand:CommandInterface?

    init(theCommand: CommandInterface? = nil) {
        self.theCommand = theCommand
    }

    func pressed(){
        self.theCommand?.execute()
    }

    func setCommand(newCommand:CommandInterface){
        self.theCommand = newCommand
    }
}


let goodLamp = GoodLamp()
let lampTurnOnCommand = LampTrunOnCommand(lamp: goodLamp)
let lampTurnOffCommand = LampTrunOffCommand(lamp:goodLamp)

let buttonOne = MyButton(theCommand: lampTurnOnCommand)
buttonOne.pressed()

buttonOne.setCommand(newCommand: lampTurnOffCommand)
buttonOne.pressed()

/*
 turnON
 turnOff
 */
커맨드 패턴
커맨드 패턴은 이벤트가 발생했을 때 실행될 기능이 다양하면서도 변경이 필요한 경우에 이벤트를 발생시키는 클래스를 변경하지 않고 재사용하고자 할 때 유용하다.
Key point : 커맨드 패턴은 실행될 기능을 캡슐화 함으로써 기능의 실행을 요구하는 호출자 클래스와 실제 기능을 실행하는 수신자 클래스 사이의 의존성을 제거한다.
따라서 실행될 기능의 변경에도 호출자 클래스를 수정 없이 그대로 사용할 수 있도록 해준다.
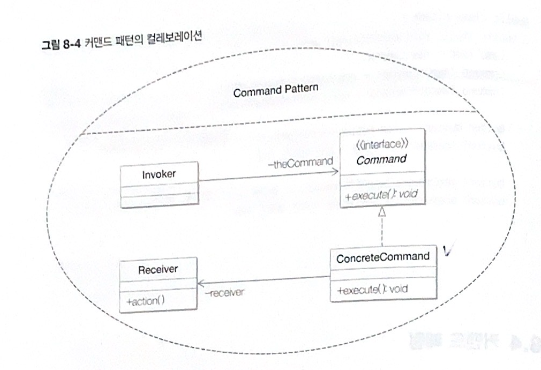
Command : 실행될 기능에 대한 인터페이스. 실행될 기능을 execute 메서드로 선언함.
ConcreteCommand: 실제로 실행되는 기능을 구현. 즉. Command 라는 인터페이스를 구현함
Invoker : 기능의 실행을 요청하는 호출자 클래스
Receiver: ConcreteCommand에서 execute 메서드를 구현할 때 필요한 클래스. 즉, ConcreteCommand의 기능을 실행하기 위해 사용하는 수신자 클래스
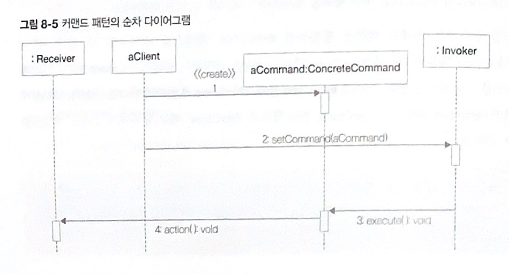
1.클라이언트가 원하는 커맨드 객체를 생성한다.
2.이를 Invoker 객체에 바인딩 한다.
3.Invoker 객체에서는 바인딩된 커멘드 객체의 execute 메서드를 호출한다.
4.execute 메서드는 Receiver 객체의 action 메서드를 호출함으로써 원하는 기능을 실행한다.
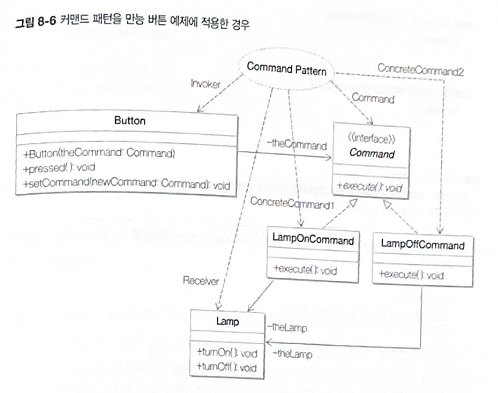
-Button 클래스는 Invoker 역할을 한다.
-LampOnCommand와 LampOffCommand는 각각 ConcreteCommand 역할을 한다.
-Lamp 클래스는 Receiver 역할을 한다.
'아이폰 개발 > 디자인 패턴' 카테고리의 다른 글
| swift 디자인 패턴 - 데코레이터 패턴 (0) | 2022.11.08 |
|---|---|
| swift 디자인 패턴 - 옵저버 패턴 (0) | 2022.11.07 |
| swift 디자인 패턴 - 상태패턴(스테이트 패턴) (0) | 2022.11.03 |
| swift 디자인 패턴 - 전략패턴(스트래티지 패턴) (0) | 2022.11.02 |
| 디자인 패턴 - solid 원칙 정리 1 (0) | 2022.11.02 |


