ios MQTT 통신 - swift로 구현하기
준비물
[1] xcode 툴
[2] ios용 MQTT 클라이언트 라이브러리(https://github.com/emqx/CocoaMQTT)
위의 주소로 들어가셔서 pod 파일 확인하시고, 프로젝트의 pod 파일에 라이브러리 명을 입력해주시고 pod install 을 해주세요.
여기서는 pod 관련한 내용은 자세히 다루지 않을거에요. 라이브러리를 설치하셨다고 가정하고 진행할게요.
[3] MQTT 브로커 역할을 해줄 서버
이 내용은 네트워크-우분투 MQTT 서버구축과 기본 개념 이 곳을 참고해주세요.
스토리보드
아래 이미지 처럼 스토리 보드를 작성해 주었습니다.
색깔별로 되어 있는 버튼들은 MQTT 통신 구독과 발행 또는 연결, 연결 종료를 처리합니다.
아래 모니터링 textView는 구독 또는 발행, 연결, 연결종료 이벤트가 발생했을 때 관련된 메시지를 표시해 줍니다.
앱이 다른 클라이언트의 토픽을 구독 중일때, 다른 클라이언트가 해당 토픽을 발행하면 모니터링 부분에 받은 메시지가 표시가 됩니다.

ViewController.swift 파일 작성
라이브러리 임포트
import CocoaMQTT
mqtt 객체 선언 및 viewDidLoad 부분에 MQTT 객체 초기화
아래와 같이 CocoaMQTT 객체를 초기화 시켜 줍니다.
CocoaMQTT 객체를 초기화 할때 필요한 인자는 1.클라이언트 아이디, 2.브로커 서버 IP, 3.포트 번호 입니다.
객체가 정상적으로 초기화 되었으면 mqtt.connect() 함수는 true를 반환해 줍니다.
    @IBOutlet weak var textView: UITextView!

    var mqtt:CocoaMQTT?

    override func viewDidLoad() {
        super.viewDidLoad()

        ///MQTT 3.1.1
        let clientID = "CocoaMQTT-" + String(ProcessInfo().processIdentifier)

        /// 서버에 1883 포트 오픈 처리 필요
        mqtt = CocoaMQTT(clientID: clientID, host: "브로커서버 IP", port: 1883)
        mqtt?.cleanSession = false

        //mqtt?.username = "test"
        //mqtt?.password = "public"
        //mqtt?.enableSSL = true

        //One-way certification 인증처리 추가
        //mqtt?.allowUntrustCACertificate = true


        mqtt?.keepAlive = 60
        mqtt?.delegate = self
        let isConnect = mqtt?.connect() ?? false
        if isConnect {
            print("✅브로커 연결 성공")
            self.textView.text += "✅브로커 연결 성공\n"
        }else{
            print("❌브로커 연결 실패")
            self.textView.text += "❌브로커 연결 실패\n"

        }

        /// [참고]델리게이트 메소드 사용 대신에 이 구문을 사용해서 메시지를 받을 수 도 있다.
    /*
        mqtt?.didReceiveMessage = { mqtt, message, id in
            print("Message received in topic \(message.topic) with payload \(message.string!)")
        }
    */

    }
mqtt 델리게이트 메소드 구현
위에보면 mqtt 대리자를 ViewController로 지정해 주었습니다.
mqtt?.delegate = self
그렇기 때문에 mqtt 프로토콜을 채택하고 필수 함수들을 구현해 줍니다.
참고로 아래 함수들은 직접 만든함수가 아니라 mqtt 모듈에 의해서 호출 되는! 제공되는 함수들 입니다.
주석을 달아놓았습니다. 보시면 이해가 될거에요. 중요한 함수들은 아래 몇가지에요.
mqtt 통신 내용에 따라 함수가 호출되면 함수로 전달되는 메시지나 파라미터 내용을 textView에 보여지게 처리했습니다.
1.MQTT 브로커와 연결이 완료되었을때 호출되는 함수
2.발행 처리 완료 함수
3.수신 메시지 받았을 때 호출되는 함수
4.연결이 끊겼을때 호출되는 함수
참고로 ping 함수와 pong 함수는 연결이 된 상태에서는 1분주기로 호출이 됩니다.
//MARK: CocoaMQTTDelegate
extension ViewController :CocoaMQTTDelegate{

    /// MQTT 연결 완료 콜백
    func mqtt(_ mqtt: CocoaMQTT, didConnectAck ack: CocoaMQTTConnAck) {

        print(":::: didConnectAck ::::")

        if ack == .accept{
            self.textView.text += ":::: 👏didConnectAck ::::\n"
            self.textView.text += ":::: 👏브로커 연결 완료 ::::\n"
        }
    }


    /// 발행 메시지
    func mqtt(_ mqtt: CocoaMQTT, didPublishMessage message: CocoaMQTTMessage, id: UInt16) {
        print(":::: didPublishMessage ::::")
        print(":::: message : \(message.string ?? "nil msg") , id: \(id)")

        self.textView.text += ":::: 📡didPublishMessage ::::\n"
        self.textView.text += ":::: 📡message : \(message.string ?? "nil msg") , id: \(id)\n"

    }

    /// 발행 완료
    func mqtt(_ mqtt: CocoaMQTT, didPublishAck id: UInt16) {
        print(":::: didPublishAck ::::")
        print(":::: id: \(id)")

        self.textView.text += ":::: 📡didPublishAck ::::\n"
        self.textView.text += ":::: 📡id: \(id)\n"
    }


    /// 구독한 토픽 메시지 Receive
    func mqtt(_ mqtt: CocoaMQTT, didReceiveMessage message: CocoaMQTTMessage, id: UInt16) {
        print(":::: 📥didReceiveMessage ::::")
        print(":::: 📥message : \(message.string ?? "nil msg") , id: \(id)")

        self.textView.text += ":::: 📥didReceiveMessage ::::\n"
        self.textView.text += ":::: 📥message : \(message.string ?? "nil msg") , id: \(id)\n"

    }

    /// 토픽 구독 성공 콜백
    func mqtt(_ mqtt: CocoaMQTT, didSubscribeTopics success: NSDictionary, failed: [String]) {
        print(":::: didSubscribeTopics ::::")
        print(":::: success: \(success)")
        print(":::: failed: \(failed)")

        self.textView.text += ":::: ✅didSubscribeTopics ::::\n"
        self.textView.text += ":::: ✅success: \(success)\n"
        //self.textView.text += ":::: ✅failed: \(failed)\n"

    }

    /// 토픽 구독 취소 콜백
    func mqtt(_ mqtt: CocoaMQTT, didUnsubscribeTopics topics: [String]) {
        print(":::: didUnsubscribeTopics ::::")
        print(":::: topics: \(topics)")

        self.textView.text += ":::: didUnsubscribeTopics ::::\n"
        self.textView.text += ":::: topics: \(topics)\n"
    }

    /// 연결 상태 체크 ping
    func mqttDidPing(_ mqtt: CocoaMQTT) {
        print(":::: mqttDidPing ::::")
        print(":::: mqtt 연결상태 : \(mqtt.connState.description)\n")


        self.textView.text += ":::: mqttDidPing ::::\n"
        self.textView.text += ":::: mqtt 연결상태 : \(mqtt.connState.description)\n"
    }

    /// 연결 상태 체크 pong
    func mqttDidReceivePong(_ mqtt: CocoaMQTT) {
        print(":::: mqttDidReceivePong ::::")
        print(":::: mqtt 연결상태 : \(mqtt.connState.description)\n")

        self.textView.text += ":::: mqttDidReceivePong ::::\n"
        self.textView.text += ":::: mqtt 연결상태 : \(mqtt.connState.description)\n"
    }

    func mqttDidDisconnect(_ mqtt: CocoaMQTT, withError err: Error?) {
        print(":::: mqttDidReceivePong ::::")
        print(":::: err : \(err?.localizedDescription ?? "error...")")

        self.textView.text += ":::: mqttDidReceivePong ::::\n"
        self.textView.text += ":::: err : \(err?.localizedDescription ?? "error...")\n"

    }
}
여러 버튼 구현
스토리 보드에서 만들어준 여러 버튼들을 구현해 줍니다.
light 구독버튼, door 구독 버튼, light 발행 버튼, door 발행버튼, 연결, 연결 종료 버튼 이벤트 함수를 작성해 줍니다.
    //MARK: 조명등 구독
    @IBAction func subLightAction(_ sender: UIButton) {
        print(">>>> subLightAction <<<<")

        if (self.mqtt?.connState == .connected) {
            self.mqtt?.subscribe("light", qos: CocoaMQTTQoS.qos2)
            print("✅ light 구독 성공")
        }else{
            print("❌연결이 끊어져있습니다.")
        }

    }

    //MARK: 문 구독
    @IBAction func subDoorAction(_ sender: UIButton) {
        print(">>>> subDoorAction <<<<")
        if (self.mqtt?.connState == .connected) {
            self.mqtt?.subscribe("door", qos: CocoaMQTTQoS.qos2)
            print("✅ door 구독 성공")
        }else{
            print("❌연결이 끊어져있습니다.")
        }
    }


    //MARK: 다시연결
    @IBAction func reConnectAction(_ sender: UIButton) {
        print(">>>> reConnectAction <<<<")
        let isConnect = mqtt?.connect() ?? false
        if isConnect {
            print("✅재연결 성공")
        }else{
            print("❌재연결 실패")
        }
    }
    //MARK: 연결종료
    @IBAction func deConnectAction(_ sender: UIButton) {
        print(">>>> deConnectAction <<<<")
        self.mqtt?.disconnect()
        print(":::: mqtt 연결상태 : \(mqtt?.connState.description ?? "")")

    }

    //MARK: 조명 발행
    @IBAction func pubLightAction(_ sender: UIButton) {
        print(">>>> pubLightAction <<<<")
        if (self.mqtt?.connState == .connected) {
            self.mqtt?.publish("light", withString: "빛이 밝아요")
            print("✅ light 발행 성공")
        }else{
            print("❌연결이 끊어져있습니다.")
        }
    }

    //MARK: 문 발행
    @IBAction func pubDoorAction(_ sender: UIButton) {
        print(">>>> pubDoorAction <<<<")
        if (self.mqtt?.connState == .connected) {
            self.mqtt?.publish("door", withString: "문이 열려있어요!!")
            print("✅ door 발행 성공")
        }else{
            print("❌연결이 끊어져있습니다.")
        }
    }
결과
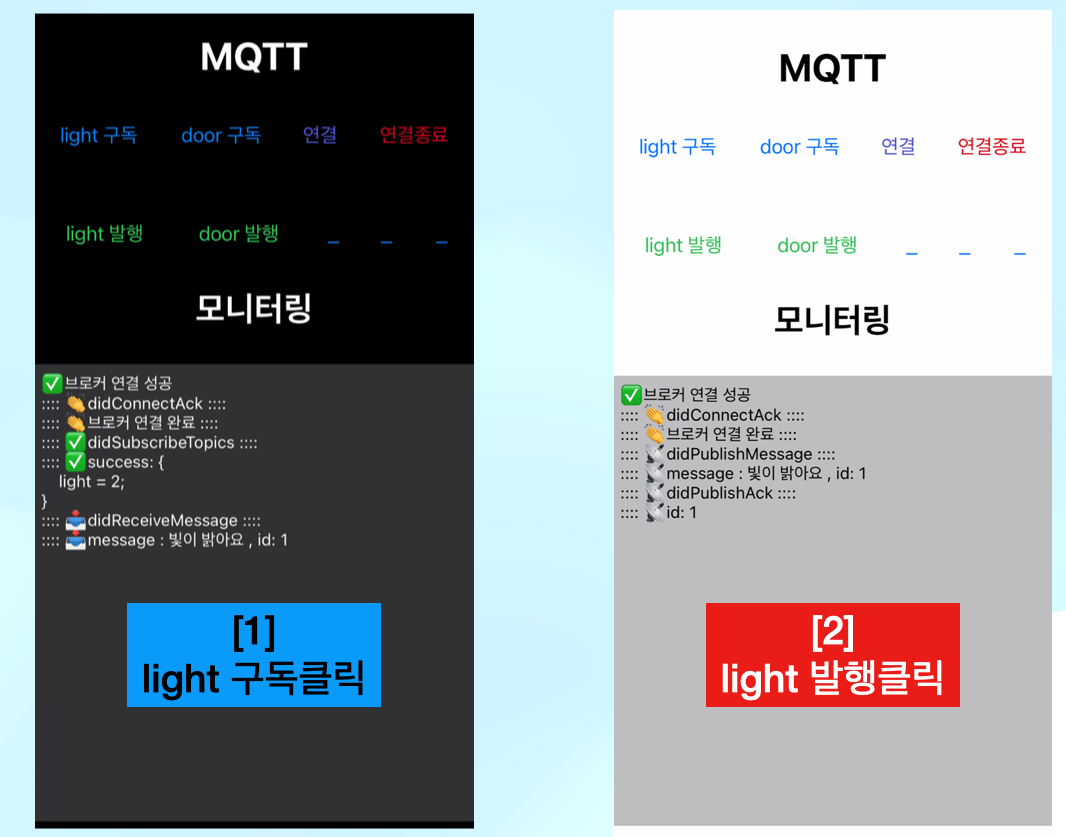
2개의 디바이스로 테스트를 진행했습니다.
2개의 디바이스 모두 각각 구독과 발행을 할 수 있지만, 이해를 돕기위해서 왼쪽의 앱을 구독 하는앱, 오른쪽을 발행하는 앱으로 동작해 보았습니다.
1. 왼쪽앱에서 light 구독 버튼을 누릅니다.
2.오른쪽앱에서 light 발행 버튼을 누릅니다.
3.우분투에서 작동되고 있는 MQTT 서버(브로커)를 통해서 오른쪽 앱에서 왼쪽앱으로 메시지가 전송된것을 확인할 수 있습니다.
소스
https://drive.google.com/file/d/1p2__htAPXsF0qBj8L-lqrjgFE-F09BbA/view?usp=sharing
'아이폰 개발 > ios 개념&튜토리얼' 카테고리의 다른 글
| mac에서 gitlab과 sourceTtree 연동 후 push 까지 (0) | 2022.09.20 |
|---|---|
| ios LFLiveKit 라이브러리 이용해서 RTMP 구현 예제 (0) | 2022.09.16 |
| swift 프로퍼티 정리 (lazy var , 연산프로퍼티, 저장 프로퍼티) (0) | 2022.09.01 |
| ios collectionView Tag cell - 여러 옵션 선택하기 기능 구현 (0) | 2022.08.03 |
| ios view Pager - 스와이프로 메뉴 처리하기 (code layout 구현) (0) | 2022.08.01 |


