ios view Pager - 스와이프로 메뉴 처리하기 (code layout 구현)
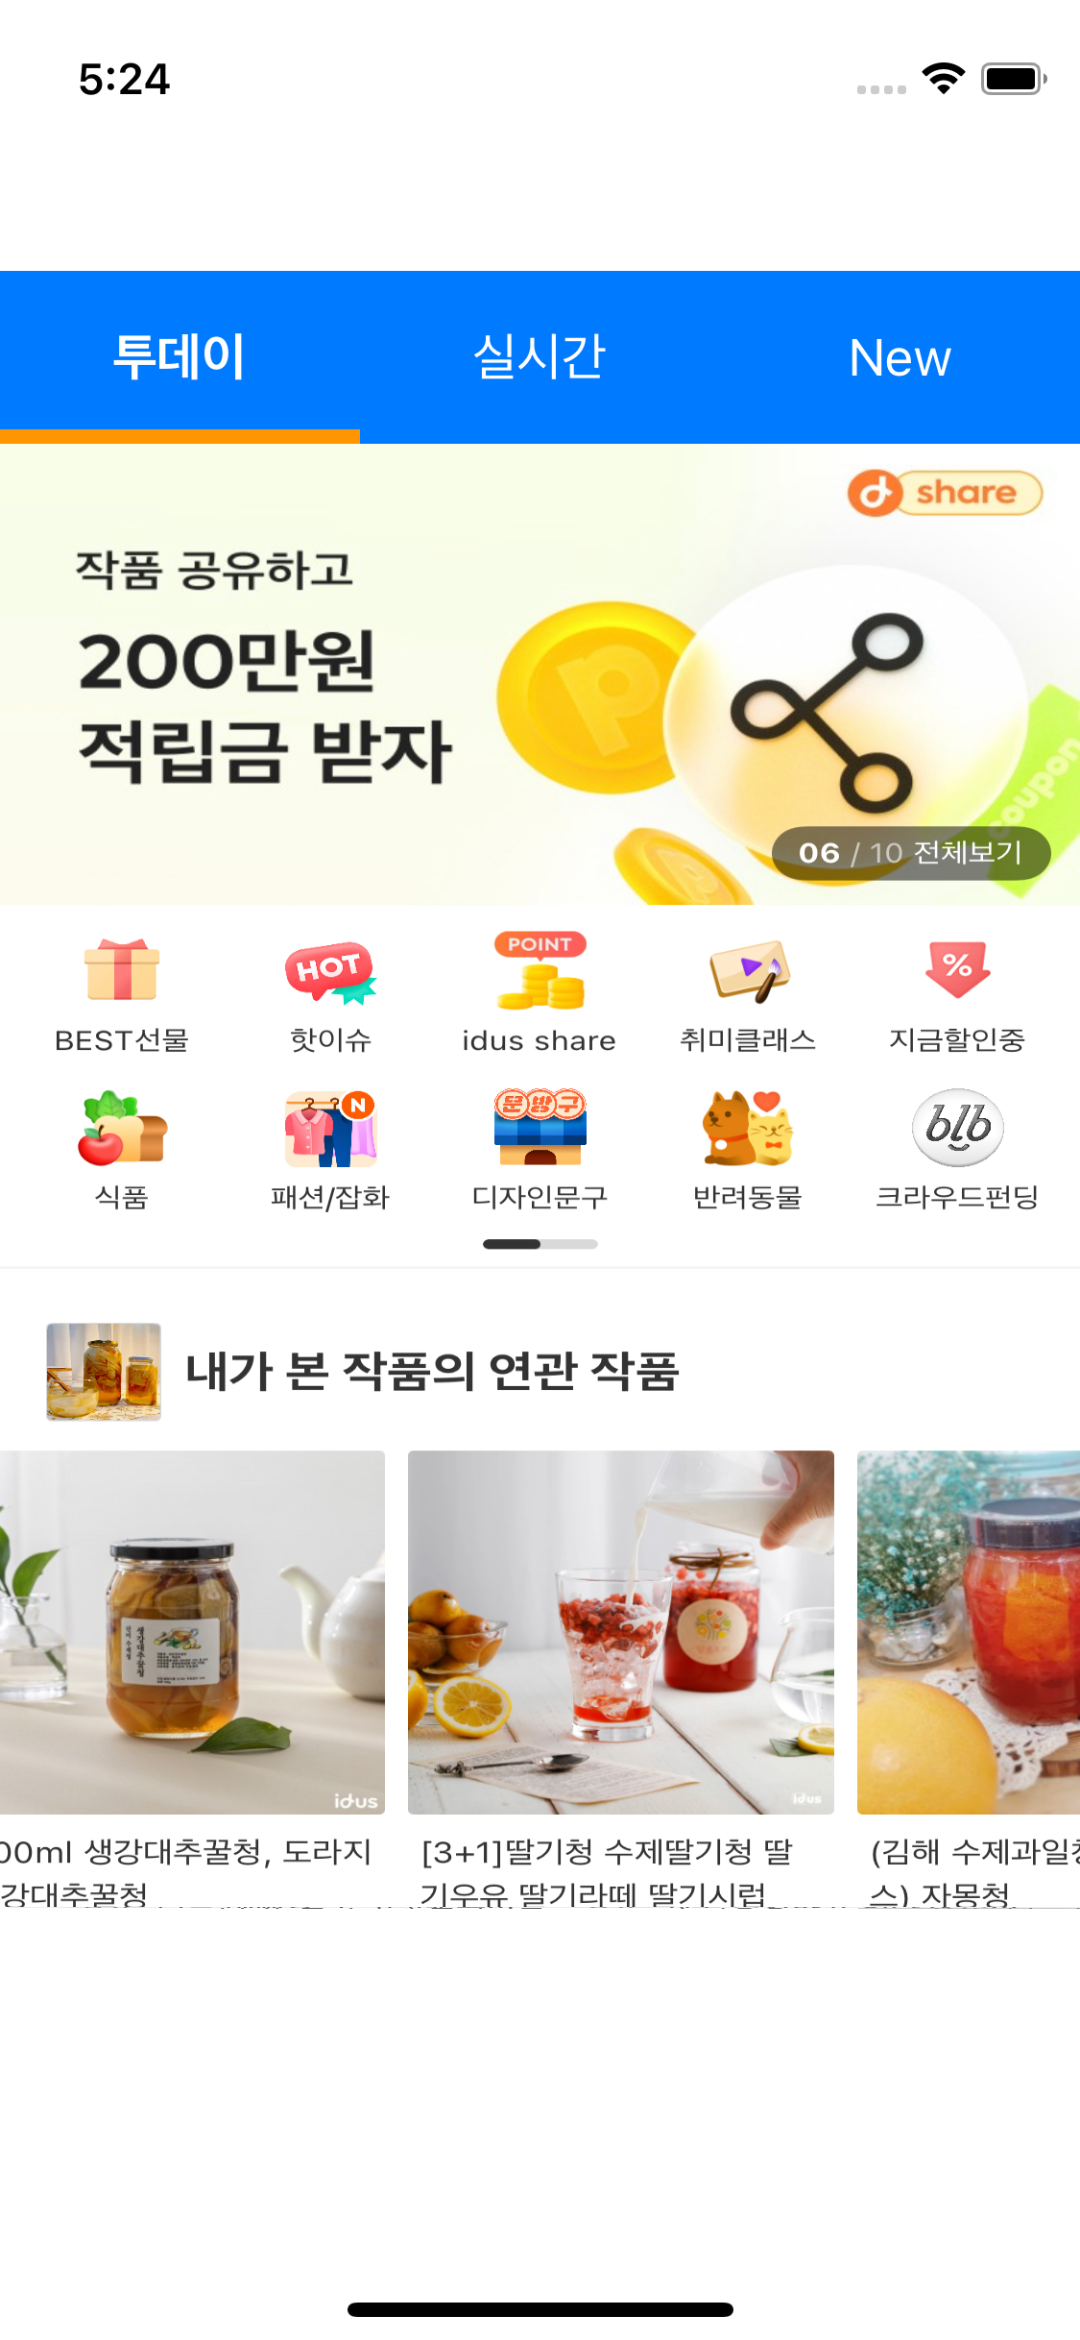
아래와 같은 UI를 어떻게 구현할 수 있을까 고민해보다가 괜찮은 아티클을 발견해서 정리해본다.
아래와 같은 UI는 상단에 제목 탭을 누르면 제목 탭 아래에 표시가 되면서 해당 화면이 자동으로 스크롤 되는 형태이다.
또한 화면을 좌으로 스와이프 하면 해당 매뉴 탭이 자동으로 선택이 되는 형태이다.
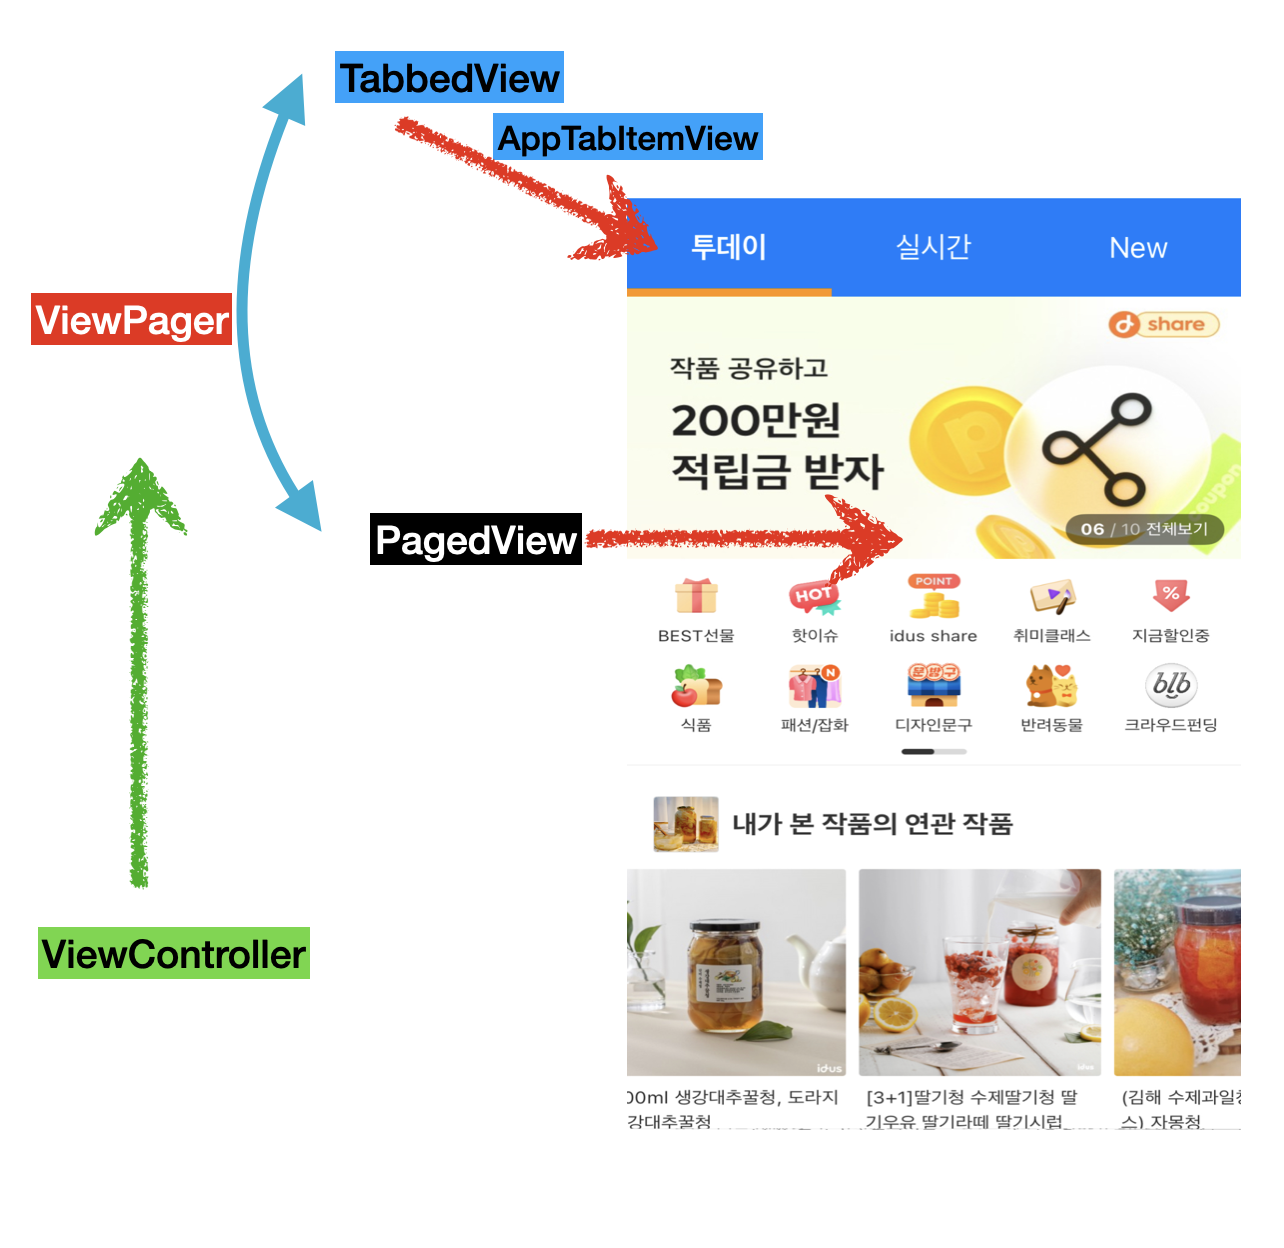
먼저 구현하기 전에 위화면의 구조를 나누어 보자.
먼저 화면은 크게 두개로 나뉜다. TabbedView와 PagedView이다.
TabbedView : 화면의 상단 탭 메뉴를 담당하며 collectionView를 가지고 있다.
PagedView : 화면의 하단 페이지를 담당하며 collectionView를 가지고 있다.
그리고 이 나뉜 두개의 View를 ViewPager라는 View에서 하나로 합친 다음 최종적으로 ViewController에서 메뉴의 개수 , 메뉴명 등 기본 값을 이용해서 ViewPager를 만들어서 사용하는 구조이다.
먼저 화면 하단의 페이지를 구현하는 PagedView의 로직은 아래와 같다. PagedViewDelegate를 가지고 있고 collectionView를 코드로 구현해 놓았다.
import UIKit

/// 유저가 스크롤 할때 다른 class로 스크롤 후 cell의 index를 보내는 함수
protocol PagedViewDelegate: AnyObject {
    func didMoveToPage(index: Int)
}

/// 아래쪽에 위치해있으며 page 로서 스크롤 가능
/// UICollectionview를 사용해서 paging 구현함
class PagedView: UIView, UICollectionViewDelegateFlowLayout, UICollectionViewDataSource {

    //STEP.1
    // MARK: - Initialization
    /// [4] pages 파라미터로 초기화
    init(pages: [UIView] = []) {

        self.pages = pages
        super.init(frame: .zero)

        self.setupUI()
    }

    required init?(coder: NSCoder) {
        fatalError("init(coder:) has not been implemented")
    }

    // MARK: - Properties
    /// [3] 페이지 프로퍼티와 delegate 프로퍼티 생성
    public weak var delegate: PagedViewDelegate?

    public var pages: [UIView] {
        didSet {
            self.collectionView.reloadData()
        }
    }

    ///[1] FlowLayout 객체 이용해서 가로 스크롤 모드로   UICollectionvView 초기화
    private lazy var collectionView: UICollectionView = {

        let layout = UICollectionViewFlowLayout()
        layout.scrollDirection = .horizontal

        let collectionView = UICollectionView(
            frame: .zero,
            collectionViewLayout: layout
        )
        /// 가로 스크롤을 숨기고, 페이징이 가능하게 처리
        collectionView.showsHorizontalScrollIndicator = false
        collectionView.isPagingEnabled = true

        ///Page cell 연결
        collectionView.register(PageCollectionViewCell.self, forCellWithReuseIdentifier: "PageCollectionViewCell")

        /// delegate,dataSource를 지정해준다.
        collectionView.delegate = self
        collectionView.dataSource = self

        ///translatesAutoresizingMaskIntoConstraints를 false로 주어 이제 코드로 UI를 만들겠다고 설정해준다.
        collectionView.translatesAutoresizingMaskIntoConstraints =  false

        return collectionView
    }()


    // MARK: - UI Setup

    /// [2] collectionView 의 크기는 현재 부모 UIView의 상,하,좌,우 모두 채워 주도록 한다.
    func setupUI() {
        self.translatesAutoresizingMaskIntoConstraints = false

        self.addSubview(collectionView)
        collectionView.backgroundColor = .white

        NSLayoutConstraint.activate([
            collectionView.widthAnchor
                .constraint(equalTo: self.widthAnchor),
            collectionView.heightAnchor
                .constraint(equalTo: self.heightAnchor),
            collectionView.centerXAnchor
                .constraint(equalTo: self.centerXAnchor),
            collectionView.centerYAnchor
                .constraint(equalTo: self.centerYAnchor)
        ])
    }

    //STEP.2
    // MARK: - Data Source
    /// [1] 페이지의 전체 수 리턴
    func collectionView(_ collectionView: UICollectionView, numberOfItemsInSection section: Int) -> Int {
        return pages.count
    }

    /// [2] 특정 페이지를 구현
    func collectionView(_ collectionView: UICollectionView, cellForItemAt indexPath: IndexPath) -> UICollectionViewCell {
        let cell = collectionView.dequeueReusableCell(withReuseIdentifier: "PageCollectionViewCell", for: indexPath) as! PageCollectionViewCell
        let page = self.pages[indexPath.item]
        cell.view = page
        return cell
    }

    // MARK: - Actions
    /// 이 함수가 호출될때 index를 이용해서 collectionView를 해당 페이지로 스크롤 한다.
    public func moveToPage(at index: Int) {
        self.collectionView.scrollToItem(at: IndexPath(item: index, section: 0), at: .centeredHorizontally, animated: true)
    }

    // MARK: - Delegate
    /// 스크롤이 종료될때 didMoveToPage를 구현한 View 또는 controller 에게 index를 알린다
    func scrollViewDidEndDecelerating(_ scrollView: UIScrollView) {
        let page = Int(self.collectionView.contentOffset.x / self.collectionView.frame.size.width)
        print("PagedView - scrollViewDidEndDecelerating - page :\(page)")
        self.delegate?.didMoveToPage(index: page)
    }

    // MARK: - Layout Delegate
    /// [3] page의 크기를 지정하는 함수. collectionview 의 가로 세로 다 차지하게 처리
    func collectionView(_ collectionView: UICollectionView, layout collectionViewLayout: UICollectionViewLayout, sizeForItemAt indexPath: IndexPath) -> CGSize {

        return CGSize(width: self.collectionView.frame.width,
                      height: self.collectionView.frame.height)
    }

    /// [4] page와 page 사이 간격은 0으로 준다.
    func collectionView(_ collectionView: UICollectionView, layout collectionViewLayout: UICollectionViewLayout, minimumLineSpacingForSectionAt section: Int) -> CGFloat {
        return 0
    }
}
PagedView안의 collectionView 가 사용할 Cell의 코드는 아래와 같다. 특별한 코드는 없고 UIView 타입의 프로퍼티를 선언하고 Cell의 크기와 동일하게 맞춰 주었다.
import UIKit

class PageCollectionViewCell: UICollectionViewCell {

    // MARK: - Initialization
    override init(frame: CGRect) {
        super.init(frame: frame)

        self.setupUI()
    }

    required init?(coder: NSCoder) {
        fatalError("init(coder:) has not been implemented")
    }

    // MARK: - UI Properties
    public var view: UIView? {
        didSet {
            self.setupUI()
        }
    }

    // MARK: - UI Setup
    private func setupUI() {
        guard let view = view else { return }

        self.contentView.addSubview(view)
        view.translatesAutoresizingMaskIntoConstraints = false

        NSLayoutConstraint.activate([
            view.leftAnchor
                .constraint(equalTo: self.contentView.leftAnchor),
            view.topAnchor
                .constraint(equalTo: self.contentView.topAnchor),
            view.rightAnchor
                .constraint(equalTo: self.contentView.rightAnchor),
            view.bottomAnchor
                .constraint(equalTo: self.contentView.bottomAnchor)
        ])
    }
}
다음은 상단의 탭 매뉴를 구성할 class를 생성해준다. 이 클래스에도 collectionView를 사용했다.
import UIKit

///step.1

/// [1] Tap이 선택되었을때 이 함수를 구현하고 있는 class or view에 선택된 cell index 리턴
protocol TabbedViewDelegate: AnyObject {
    func didMoveToTab(at index: Int)
}

/*
 책임: 화면 상단에서 하나만 선택되게 작동
 */
class TabbedView: UIView {

    /// [2] 열거형을 이용해서 cell의 사이즈를 지정한다.
    /// fillEqually 가 호출 되면 탭 메뉴 아래 View가 표시된다.
    enum SizeConfiguration {

        case fillEqually(height: CGFloat, spacing: CGFloat = 0)

        case fixed(width: CGFloat, height: CGFloat, spacing: CGFloat = 0)

        var height: CGFloat {
            switch self {
            case let .fillEqually(height, _):
                return height
            case let .fixed(_, height, _):
                return height
            }
        }
    }

    // MARK: - Lifecycle
    /// [3] cell 사이즈 Enum 과 TabItemProtocol 을 채택하고 있는 Tab 배열을 인자로 받아서 초기화 한다.
    init(sizeConfiguration: SizeConfiguration, tabs: [TabItemProtocol] = []) {

        /// [!] 초기화 하기 전에 데이터를 set 해주어야함
        self.sizeConfiguration = sizeConfiguration
        self.tabs = tabs

        super.init(frame: .zero)

        self.setupUI()
    }

    required init?(coder: NSCoder) {
        fatalError("init(coder:) has not been implemented")
    }

    // MARK: - Properties
    weak var delegate: TabbedViewDelegate?

    /// 크기 위치 설정 값
    public let sizeConfiguration: SizeConfiguration

    ///TabItemProtocol를 채택한 View 들
    public var tabs: [TabItemProtocol] {
        didSet {
            /// tabs가 설정되면 collectionView 리로드 해줌
            self.collectionView.reloadData()
            /// 기본적으로 첫번째 index가 선택되게 처리
            self.tabs[currentlySelectedIndex].onSelected()
        }
    }

    /// [4] 선택된 Tap cell Index
    private var currentlySelectedIndex: Int = 0


    // [5] PagedView의 collectionView와 동일하게 초기화
    private lazy var collectionView: UICollectionView = {
        let layout = UICollectionViewFlowLayout()
        layout.scrollDirection = .horizontal
        layout.estimatedItemSize = .zero
        let collectionView = UICollectionView(
            frame: .zero,
            collectionViewLayout: layout
        )
        collectionView.backgroundColor = .white

        collectionView.register(TabCollectionViewCell.self, forCellWithReuseIdentifier: "TabCollectionViewCell")

        collectionView.dataSource = self
        collectionView.delegate = self
        collectionView.showsHorizontalScrollIndicator = false
        collectionView.translatesAutoresizingMaskIntoConstraints =  false
        return collectionView
    }()

    // MARK: - Action
    public func moveToTab(at index: Int) {
        /// 클릭한 index를 이용해서 scorllo
        self.collectionView.scrollToItem(at: IndexPath(item: index, section: 0), at: .centeredHorizontally, animated: true)
        /// 현재 선택된 cell 선택 해제
        self.tabs[currentlySelectedIndex].onNotSelected()

        /// 새롭게 선택된 cell Index 기준으로 선택표시
        self.tabs[index].onSelected()
        self.currentlySelectedIndex = index
    }


    // MARK: UI Setup
    /// [6] collectionView 의 크기는 현재 부모 UIView의 상,하,좌,우 모두 채워 주도록 한다.
    private func setupUI() {
        self.translatesAutoresizingMaskIntoConstraints = false

        self.addSubview(collectionView)


        NSLayoutConstraint.activate([
            collectionView.leftAnchor
                .constraint(equalTo: self.leftAnchor),
            collectionView.topAnchor
                .constraint(equalTo: self.topAnchor),
            collectionView.rightAnchor
                .constraint(equalTo: self.rightAnchor),
            collectionView.bottomAnchor
                .constraint(equalTo: self.bottomAnchor)
        ])
    }
}


///step.2
extension TabbedView: UICollectionViewDelegateFlowLayout {

    ///[1] sizeConfiguration 속성을 이용해서 각 탭의 크기를 설정한다.
    func collectionView(_ collectionView: UICollectionView, layout collectionViewLayout: UICollectionViewLayout, sizeForItemAt indexPath: IndexPath) -> CGSize {

        switch sizeConfiguration {

        case let .fillEqually(height, spacing):
            let totalWidth = self.frame.width
            let widthPerItem = (
                totalWidth - (
                    spacing * CGFloat((self.tabs.count + 1))
                )
            ) / CGFloat(self.tabs.count)

            return CGSize(width: widthPerItem,
                          height: height)

        case let .fixed(width, height, spacing):
            return CGSize(width: width - (spacing * 2),
                          height: height)
        }
    }

    ///[2] sizeConfiguration를 기준으로 탭 사이 간격을 리턴 한다.
    func collectionView(_ collectionView: UICollectionView, layout collectionViewLayout: UICollectionViewLayout, minimumLineSpacingForSectionAt section: Int) -> CGFloat {
        switch sizeConfiguration {
        case let .fillEqually(_, spacing),
             let .fixed(_, _, spacing):

            return spacing
        }
    }
}

extension TabbedView: UICollectionViewDataSource {
    /// [3] cell 의 개수 리턴
    func collectionView(_ collectionView: UICollectionView, numberOfItemsInSection section: Int) -> Int {
        return tabs.count
    }

    /// [4] cell 탭 안의 내용 리턴
    func collectionView(_ collectionView: UICollectionView, cellForItemAt indexPath: IndexPath) -> UICollectionViewCell {
        let cell = collectionView.dequeueReusableCell(withReuseIdentifier: "TabCollectionViewCell", for: indexPath) as! TabCollectionViewCell
        cell.view = tabs[indexPath.row]
        return cell
    }
}

extension TabbedView: UICollectionViewDelegate {
    ///[5] 특정 탭을 선택 했을 때 didMoveToTab 메소드를 구현한 class or View에게 index와 함께 알린다.
    func collectionView(_ collectionView: UICollectionView, didSelectItemAt indexPath: IndexPath) {
        self.moveToTab(at: indexPath.item)
        self.delegate?.didMoveToTab(at: indexPath.item)
    }
}
TabbedView의 collectionView에 등록해줄 collectionViewCell은 아래와 같다. 특정 프로토콜이 있고, cell을 선택했을때, 선택이 해제 되었을때 처리되는 메소드가 존재한다. 주목해 볼점은 TabItemProtocol을 채택한 View를 가지고 있다는 점이다. TabItemProtocol을 채택한 View class 는 아래에서 구현해보자.
import UIKit

/// [1] 모든 메뉴 탭 들은 TabItemProtocol 을 채택하여
/// onSelected 메소드와 onNotSelected 메소드를 구현 해야 한다.
protocol TabItemProtocol: UIView {
    func onSelected()
    func onNotSelected()
}

class TabCollectionViewCell: UICollectionViewCell {

    // MARK: - Initialization
    override init(frame: CGRect) {
        super.init(frame: frame)
    }

    required init?(coder: NSCoder) {
        fatalError("init(coder:) has not been implemented")
    }


    // MARK: - Properties
    /// [2] TabItemProtocol을 채택한 View가 할당 될때 UI를 셋팅 ->  setupUI() 해준다.
    public var view: TabItemProtocol? {
        didSet {
            self.setupUI()
        }
    }

    ///[3] 메뉴탭의  contentInsets이 set 될때 제약조건들을 update 해준다.
    var leftConstraint = NSLayoutConstraint()
    var topConstraint = NSLayoutConstraint()
    var rightConstraint = NSLayoutConstraint()
    var bottomConstraint = NSLayoutConstraint()

    public var contentInsets: UIEdgeInsets = UIEdgeInsets(
        top: 0,
        left: 0,
        bottom: 0,
        right: 0
    ) {
        didSet {
            leftConstraint.constant = contentInsets.left
            topConstraint.constant = contentInsets.top
            rightConstraint.constant = -contentInsets.right
            bottomConstraint.constant = -contentInsets.bottom
            self.contentView.layoutIfNeeded()
        }
    }

    // MARK: - UI Setup
    /// [4] TabItemProtocol을 채택한 View의 크기와 위치(제약조건)를 현재 이 cell에 가득 채운다.
    private func setupUI() {


        guard let view = view else { return }

        self.contentView.addSubview(view)
        view.translatesAutoresizingMaskIntoConstraints = false

        leftConstraint = view.leftAnchor
            .constraint(equalTo: self.contentView.leftAnchor,
                        constant: contentInsets.left)
        topConstraint = view.topAnchor
            .constraint(equalTo: self.contentView.topAnchor,
                        constant: contentInsets.top)
        rightConstraint = view.rightAnchor
            .constraint(equalTo: self.contentView.rightAnchor,
                        constant: -contentInsets.right)
        bottomConstraint = view.bottomAnchor
            .constraint(equalTo: self.contentView.bottomAnchor,
                        constant: -contentInsets.bottom)

        NSLayoutConstraint.activate([
            leftConstraint,
            topConstraint,
            rightConstraint,
            bottomConstraint
        ])
    }
}
TabItemProtocol을 채택한 View class로 탭 메뉴 collectionView Cell 안에서 메뉴 제목, 선택된 표시 등을 해주는 class 이다.
나중에 각각의 AppTabItemView를 생성해서 TabCollectionViewCell에 넣어주어야 한다.
import UIKit

class AppTabItemView: UIView, TabItemProtocol {

    /// [1] 타이틀을 인자로 초기화
    init(title: String) {
        self.title = title
        super.init(frame: .zero)

        self.translatesAutoresizingMaskIntoConstraints = false
        self.setupUI()
    }

    required init?(coder: NSCoder) {
        fatalError("")
    }

    private let title: String

    ///[2] 타이틀 라벨 코드로 생성
    lazy var titleLabel: UILabel = {
        let label = UILabel()
        label.font = .systemFont(ofSize: 18)
        label.textColor = .white
        label.text = title
        label.translatesAutoresizingMaskIntoConstraints = false
        return label
    }()

    ///[3] 타이틀 아래 표시 View 생성
    lazy var borderView: UIView = {
        let view = UIView()
        view.backgroundColor = .systemOrange
        view.translatesAutoresizingMaskIntoConstraints = false
        return view
    }()

    ///[4] 타이틀 클릭시 - bold 표시 + borderView 하단 표시
    func onSelected() {
        self.titleLabel.font = .systemFont(ofSize: 18, weight: .bold)

        if borderView.superview == nil {
            self.addSubview(borderView)

            NSLayoutConstraint.activate([
                borderView.leftAnchor.constraint(equalTo: self.leftAnchor),
                borderView.rightAnchor.constraint(equalTo: self.rightAnchor),
                borderView.heightAnchor.constraint(equalToConstant: 5),
                borderView.bottomAnchor.constraint(equalTo: self.bottomAnchor)
            ])
        }
    }

    /// 선택에서 해제될 때 borderView 제거
    func onNotSelected() {
        self.titleLabel.font = .systemFont(ofSize: 18)

        self.layer.shadowOpacity = 0

        self.borderView.removeFromSuperview()
    }


    // MARK: - UI Setup
    private func setupUI() {
        self.backgroundColor = .systemBlue
        self.addSubview(titleLabel)

        NSLayoutConstraint.activate([
            titleLabel.centerXAnchor.constraint(equalTo: self.centerXAnchor),
            titleLabel.centerYAnchor.constraint(equalTo: self.centerYAnchor)
        ])
    }
}
마지막으로 위에서 만든 매뉴View와 페이지View를 합쳐줄 View Class를 하나 만들어 준다.
ViewPager class 에는 TabbedView와 PagedView를 모두 가지고 있다. 그리고 주목해 볼점은 TabbedView와 PagedView의 프로토콜의 대리자가 모두 ViewPager인것이다. 그래서 메뉴탭이 클릭되었을때도 ViewPager의 특정 함수가 호출되고, 페이지가 스와이프될때도 ViewPager의 특정 함수가 호출된다. 특정 함수라는 것이 여기서는 메뉴탭이 클릭되었을때 해당 메뉴에 맞는 페이지로 이동 시키는 함수와 페이지가 스와이프 되었을 때 해당 메뉴 탭을 클릭시키는 것이다.
import UIKit

/*
 TabbedView 와 PagedView 를 결합하여 작동
 */
class ViewPager: UIView {

    // MARK: - Initialization
    /// [1] cell 크기 설정 값인 SizeConfiguration Enum 값으로  View 초기화
    init(tabSizeConfiguration: TabbedView.SizeConfiguration) {
        self.sizeConfiguration = tabSizeConfiguration
        super.init(frame: .zero)

        self.setupUI()

        /// 탭뷰와 페이지뷰의 대리자 = ViewPager
        tabbedView.delegate =  self
        pagedView.delegate = self
    }

    required init?(coder: NSCoder) {
        fatalError("init(coder:) has not been implemented")
    }
    /// 크기 설정 값
    public let sizeConfiguration: TabbedView.SizeConfiguration

    //MARK: 탭 View
    /// [2] TabbedView에 할당 받은 cell 크기 정보인 sizeConfiguration 할당
    public lazy var tabbedView: TabbedView = {
        let tabbedView = TabbedView(
            sizeConfiguration: sizeConfiguration
        )
        return tabbedView
    }()

    //MAKR: 페이지 View
    public let pagedView = PagedView()

    // MARK: - UI Setup
    ///[3] 탭뷰는 위쪽에 배치하고, 페이지뷰는 아래 쪽에 배치 한다.
    private func setupUI() {
        self.translatesAutoresizingMaskIntoConstraints = false

        self.addSubview(tabbedView)
        self.addSubview(pagedView)

        /// 메뉴 탭뷰는 위쪽
        NSLayoutConstraint.activate([
            tabbedView.leftAnchor
                .constraint(equalTo: self.leftAnchor),
            tabbedView.topAnchor
                .constraint(equalTo: self.topAnchor),
            tabbedView.rightAnchor
                .constraint(equalTo: self.rightAnchor),
            tabbedView.heightAnchor
                .constraint(equalToConstant: sizeConfiguration.height)
        ])

        /// 페이지 뷰는 아래쪼
        NSLayoutConstraint.activate([
            pagedView.leftAnchor
                .constraint(equalTo: self.leftAnchor),
            pagedView.topAnchor
                .constraint(equalTo: self.tabbedView.bottomAnchor),
            pagedView.rightAnchor
                .constraint(equalTo: self.rightAnchor),
            pagedView.bottomAnchor
                .constraint(equalTo: self.bottomAnchor)
        ])
    }
}

/// 4
extension ViewPager: TabbedViewDelegate {
    func didMoveToTab(at index: Int) {
        /// 유저가 탭을 클릭했을 경우 페이지도 해당 index로 이동
        self.pagedView.moveToPage(at: index)
    }
}

extension  ViewPager: PagedViewDelegate {

    func didMoveToPage(index: Int) {
        /// 유저가 페이지를 스크롤 했을 경우 해당 index에 맞는 탭으로 이동
        self.tabbedView.moveToTab(at: index)
    }
}
이제 진짜 마지막으로 ViewController에서 위에서 만든 ViewPager를 호출해주면 된다.
import UIKit

class ViewController: UIViewController {

    ///[1] ViewPager 를 크기 정보 fillEqually로 초기화
    lazy var viewPager: ViewPager = {
        let viewPager = ViewPager(
            tabSizeConfiguration: .fillEqually(height: 60, spacing: 0)
        )


        ///[2] 서로 다른 배경색을 가진 3개의 View 생성 - PageView가 될 예정
        let view1 = UIView()
        view1.backgroundColor = .red

        let view1ImageView = UIImageView()
        view1ImageView.image = UIImage(named: "a.jpg")
        view1.addSubview(view1ImageView)
        view1ImageView.translatesAutoresizingMaskIntoConstraints = false
        NSLayoutConstraint.activate([
            view1ImageView.widthAnchor.constraint(equalTo: view1.widthAnchor),
            view1ImageView.heightAnchor.constraint(equalTo: view1.heightAnchor),
            view1ImageView.centerXAnchor.constraint(equalTo: view1.centerXAnchor),
            view1ImageView.centerYAnchor.constraint(equalTo: view1.centerYAnchor)
        ])


        let view2 = UIView()
        view2.backgroundColor = .blue
        let view2ImageView = UIImageView()
        view2ImageView.image = UIImage(named: "b.jpg")
        view2.addSubview(view2ImageView)
        view2ImageView.translatesAutoresizingMaskIntoConstraints = false
        NSLayoutConstraint.activate([
            view2ImageView.widthAnchor.constraint(equalTo: view2.widthAnchor),
            view2ImageView.heightAnchor.constraint(equalTo: view2.heightAnchor),
            view2ImageView.centerXAnchor.constraint(equalTo: view2.centerXAnchor),
            view2ImageView.centerYAnchor.constraint(equalTo: view2.centerYAnchor)
        ])


        let view3 = UIView()
        view3.backgroundColor = .orange
        let view3ImageView = UIImageView()
        view3ImageView.image = UIImage(named: "b.jpg")
        view3.addSubview(view3ImageView)
        view3ImageView.translatesAutoresizingMaskIntoConstraints = false
        NSLayoutConstraint.activate([
            view3ImageView.widthAnchor.constraint(equalTo: view3.widthAnchor),
            view3ImageView.heightAnchor.constraint(equalTo: view3.heightAnchor),
            view3ImageView.centerXAnchor.constraint(equalTo: view3.centerXAnchor),
            view3ImageView.centerYAnchor.constraint(equalTo: view3.centerYAnchor)
        ])

        ///[3]
        viewPager.tabbedView.tabs = [
            AppTabItemView(title: "투데이"),
            AppTabItemView(title: "실시간"),
            AppTabItemView(title: "New")
        ]
        viewPager.pagedView.pages = [
            view1,
            view2,
            view3
        ]
        viewPager.translatesAutoresizingMaskIntoConstraints = false
        return viewPager
    }()


    override func viewDidLoad() {
        super.viewDidLoad()

        self.overrideUserInterfaceStyle = .light
        self.view.backgroundColor = .white

        ///[4] viewPager를 화면에 배치하고 사용가능한 높이의 70%만 채움
        self.view.addSubview(viewPager)


        NSLayoutConstraint.activate([
            viewPager.widthAnchor.constraint(equalTo: self.view.widthAnchor),
            viewPager.heightAnchor.constraint(equalTo: self.view.heightAnchor, multiplier: 0.7),
            viewPager.centerXAnchor.constraint(equalTo: self.view.centerXAnchor),
            viewPager.topAnchor.constraint(equalTo: self.view.safeAreaLayoutGuide.topAnchor)
        ])
    }

    override func viewWillAppear(_ animated: Bool) {
        super.viewWillAppear(animated)

        self.navigationItem.title = "ViewPager"

        self.navigationController?.navigationBar.standardAppearance.backgroundColor = .systemBlue
        self.navigationController?.navigationBar.standardAppearance.titleTextAttributes = [.foregroundColor: UIColor.white]
    }


}
자료
https://drive.google.com/file/d/1cWuFemAtHO5uMqizs-GWCIlNmUZIb9dO/view?usp=sharing
참고
https://betterprogramming.pub/how-to-create-a-view-pager-in-swift-5-b8f35a03d968
'아이폰 개발 > ios 개념&튜토리얼' 카테고리의 다른 글
| swift 프로퍼티 정리 (lazy var , 연산프로퍼티, 저장 프로퍼티) (0) | 2022.09.01 |
|---|---|
| ios collectionView Tag cell - 여러 옵션 선택하기 기능 구현 (0) | 2022.08.03 |
| 디스패치 큐 사용시 주의 사항 (0) | 2021.07.03 |
| swift 디스패치큐의 종류 특성 (0) | 2021.07.01 |
| swift 직렬과 동시 & 동기와 비동기 개념 (0) | 2021.07.01 |


